
Blackwork Roads: March Chunk
- vafibrearts

- Mar 4, 2025
- 7 min read
Hello Friends and Happy March!
The arrival of the month of March is such an interesting time in Ontario; it signals the arrival of Spring with the approach of the Vernal Equinox, yet the world outside typically remains very Wintery for most of the month.
For now, the snowbank in my front yard remains around chest height, but that may change over the next few weeks as we are expecting some weather above freezing! But while I much prefer the warmer weather, melting snow and temperatures that hover around freezing lead to lots of ice, which I don't love.
I suppose we'll have to wait and see how the weather actually pans out, so for now, let's take a look at this month's new Blackwork Roads chunk!
March Chunk
This month, we will be making he third corner of the Blackwork Roads quilt! Like the previous two corners, the block used for this chunk is based on a combination of the traditional Kings Crown and Sawtooth Star blocks, but with another new colour layout!
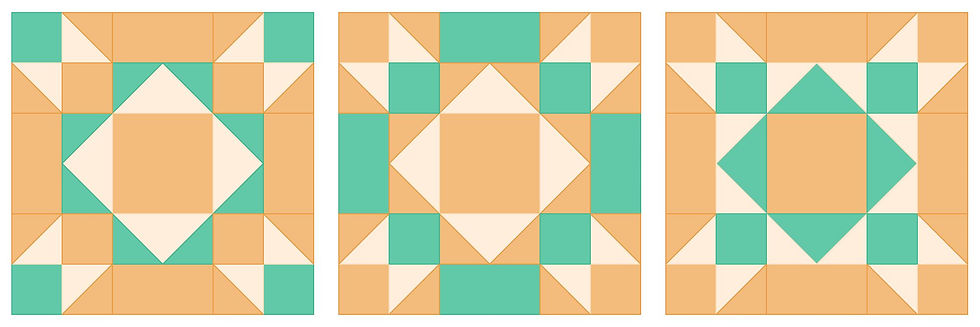
Here we see the November (left), January (centre), and new March (right) layouts side by side, giving us an idea of just how much the block has changed!
And once we've made a few of that March block, we can stitch them together to make our completed chunk!
Like the other corner chunks made so far, this one is an oblong hexagon when complete, so I recommend running a stay stitch around the outer edge to help it stay in shape until we finally piece together the finished quilt top!
Pattern Notes
sew all seams using a ¼” seam allowance
press each seam before sewing the next and before trimming units
to cut diagonally one, yielding two triangles should look like this

to cut diagonally twice, yielding four triangles should look like this:

read all pattern instructions and notes before beginning to piece
Cutting Instructions
Cut the pieces that correspond to your chosen quilt size and sort them based on the units they will be used in as labelled.
Small Quilt
BG: 1 square at 6½” (for finishing)
32 squares at 2" (16 for HSTs, 16 for FG)
Acc: 4 squares at 3⅜” (for FG)
4 squares at 2" (for TiaTs)
12 squares at 1½” (for QSs)
Lt.1: 1 square at 2⅞”, cut in half diagonally once to yield two triangles each
(for finishing)
4 bars at 2½”x 1½” (for GaBs)
1 square at 2½” (for finishing)
6 squares at 2" (for HSTs)
6 squares at 1½” (for QSs)
Md.1: 8 bars at 2½”x 1½” (for GaBs)
6 squares at 2" (2 for TiaTs, 4 for HSTs)
2 squares at 1½” (for QSs)
Dk.1: 1 square at 2⅞”, cut in half diagonally once to yield two triangles each
(for finishing)
4 bars at 2½”x 1½” (for GaBs)
1 square at 2½” (for finishing)
8 squares at 2" (2 for TiaTs, 6 for HSTs)
4 squares at 1½” (for QSs)
Medium Quilt
BG: 1 square at 9½” (for finishing)
32 squares at 2½" (16 for HSTs, 16 for FG)
Acc: 4 squares at 4⅜” (for FG)
4 squares at 2½" (for TiaTs)
12 squares at 2” (for QSs)
Lt.1: 1 square at 3⅞”, cut in half diagonally once to yield two triangles each
(for finishing)
4 bars at 3½”x 2” (for GaBs)
1 square at 3½” (for finishing)
6 squares at 2½" (for HSTs)
6 squares at 2” (for QSs)
Md.1: 8 bars at 3½”x 2” (for GaBs)
6 squares at 2½" (2 for TiaTs, 4 for HSTs)
2 squares at 2” (for QSs)
Dk.1: 1 square at 3⅞”, cut in half diagonally once to yield two triangles each
(for finishing)
4 bars at 3½”x 2” (for GaBs)
1 square at 3½” (for finishing)
8 squares at 2½" (2 for TiaTs, 6 for HSTs)
4 squares at 2” (for QSs)
Large Quilt
BG: 1 square at 12½” (for finishing)
32 squares at 3" (16 for HSTs, 16 for FG)
Acc: 4 squares at 5⅜” (for FG)
4 squares at 3" (for TiaTs)
12 squares at 2½” (for QSs)
Lt.1: 1 square at 4⅞”, cut in half diagonally once to yield two triangles each
(for finishing)
4 bars at 4½”x 2½” (for GaBs)
1 square at 4½” (for finishing)
6 squares at 3" (for HSTs)
6 squares at 2½” (for QSs)
Md.1: 8 bars at 4½”x 2½” (for GaBs)
6 squares at 3" (2 for TiaTs, 4 for HSTs)
2 squares at 2½” (for QSs)
Dk.1: 1 square at 4⅞”, cut in half diagonally once to yield two triangles each
(for finishing)
4 bars at 4½”x 2½” (for GaBs)
1 square at 4½” (for finishing)
8 squares at 3" (2 for TiaTs, 6 for HSTs)
4 squares at 2½” (for QSs)
Unit Piecing Instructions
Four at a Time Flying Geese (FG):
Select one large Acc square and four small BG squares. Draw a diagonal line on the back of each BG square.
Place two BG squares in opposite corners of the Acc square with the drawn lines running through the middle. Sew ¼” to either side of the drawn line.

Cut along the drawn line to separate into two units.
Place a third BG square on the Acc corner of the pieced unit with the drawn line running towards the centre of the unit. Sew ¼” to either side of the drawn line.

Cut along the drawn line to separate into two units.
Repeat to yield four units total.
Trim to 2½”x 1½” for a small quilt.
Trim to 3½”x 2" for a medium quilt.
Trim to 4½”x 2½” for a large quilt.
Make 16 Acc FG units.
Goose and Bars (GaBs):
Select one Acc FG unit and one Lt.1 bar. Sew together along the long edge with the FG pointing at the bar.

Trim to 2½” for a small quilt.
Trim to 3½” for a medium quilt.
Trim to 4½” for a large quilt.
Make 4 Lt.1 GaB units.

Make 8 Md.1 GaB units.

Make 4 Md.1 GaB units.
Two at a Time Half Square Triangles (HSTs):
Select one BG square and one Lt.1 square. Draw a diagonal line on the back of the Lt.1 square.
Place the BG square on the Lt.1 square and sew ¼” to either side of the drawn line.

Cut along the drawn line to separate into two units.
Trim to 1½” for a small quilt.
Trim to 2" for a medium quilt.
Trim to 2½” for a large quilt.
Make 12 Lt.1 HST units.

Make 8 Md.1 HST units.

Make 12 Dk.1 HST units.
Quarter Stars (QSs):
Select one Acc square, one Lt.1 square, and two Lt.1 HSTs.
Assemble into a four patch unit with the HSTs in opposite corners and the BG triangles pointing to the centre of the unit.

Trim to 2½” for a small quilt.
Trim to 3½” for a medium quilt.
Trim to 4½” for a large quilt.
Make 6 Lt.1 QS units.

Make 2 Md.1 QS units.

Make 4 Dk.1 QS units.
Two at a Time Triangle in a Triangles (TiaT):
Select one Acc square, one Md.1 square, and two Md.1 HSTs.
Cut the Acc and Md.1 squares in half diagonally once to yield two triangles each.
Sew one Acc triangle to the right side of the BG half of the HST, and one Md.1 triangle to the adjacent BG half of the HST as shown:

Assemble the remaining pieces in the opposite orientation with the Md.1 triangle to the right of the BG half of the HST, and the Acc triangle on the adjacent side as shown:

Make 2 left and 2 right facing Md.1 TiaT units.

Make 2 left and 2 right facing Dk.1 TiaT units.
Finishing Instructions
March Side Left:
Select one Md.1 GaB, one Dk.1 GaB, one Dk.1 QS, one Dk.1 triangle, and two Dk.1 TiaTs.
Assemble as shown:

Using the block above and one BG square, assemble the March Side Left as shown:

March Centre:
Select one Lt.1 triangle, one Lt.1 GaB, one Lt.1 QS, one Md.1 GaB, and two Md.1 TiaTs.
Assemble as shown:

Select two Md.1 GaBs, two Md.1 QSs, one Dk.1 square, two Dk.1 GaBs, and two Dk.1 QSs.
Assemble as shown:

Select one Md.1 GaB, one Dk.1 GaB, one Dk.1 QS, one Dk.1 triangle, and two Dk.1 TiaTs.
Assemble as shown:

Using the three blocks above, assemble the March Centre as shown:

March Side Right:
Select one Lt.1 square four Lt.1 QSs, two Lt.1 GaBs, and two Md.1 GaBs.
Assemble as shown:

Select one Lt.1 triangle, one Lt.1 QS, one Lt.1 GaB, one Md.1 GaB, and two Md.1 TiaTs.
Assemble as shown:

Using the two blocks above, assemble the March Side Right as shown:

March Chunk Assembly:
Assemble the March Side Left, Centre, and Side Right into the complete March Chunk as shown:

Full PDF instructions for the March chunk, including a few additional notes, can be downloaded here:
Blackwork Roads Sample Quilt
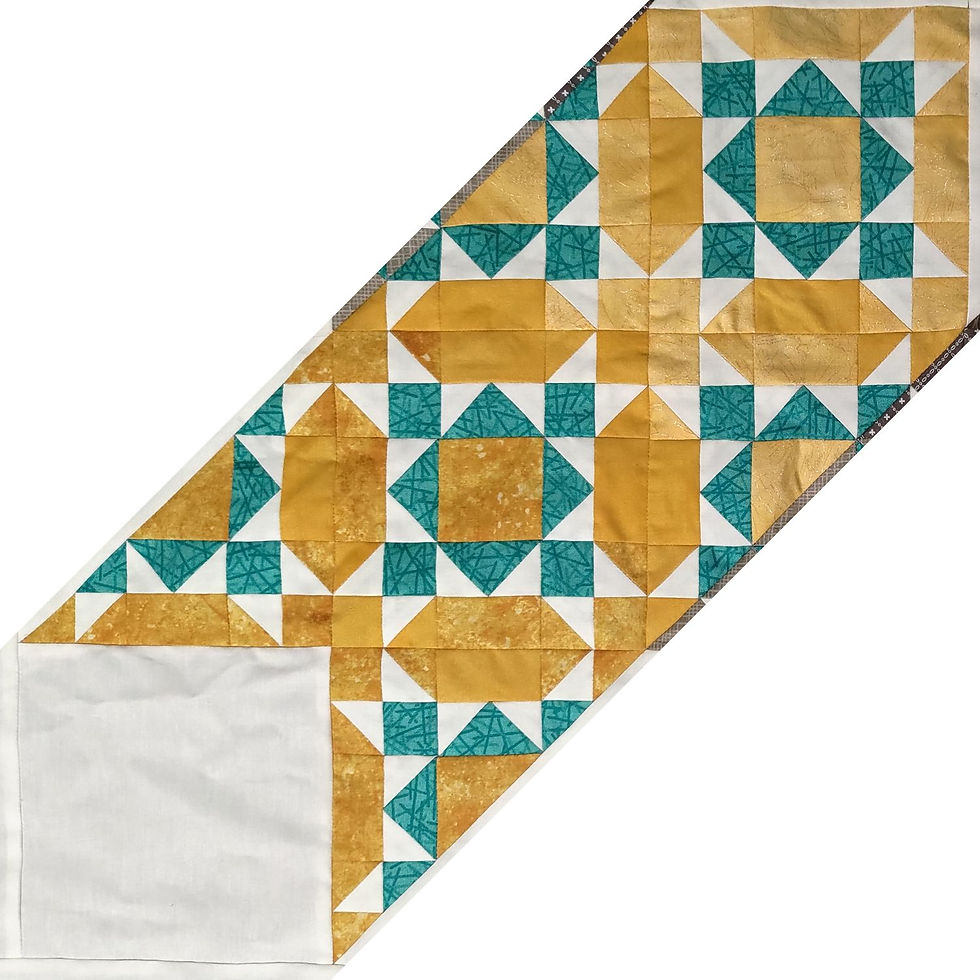
After replacing the not-quite-the-right-white pieces in my Blackwork Roads quilt top, I've been waiting for a day that wasn't too bright, wasn't too dark, and wasn't too windy so I can photograph the properly finished quilt top.
This morning, the weather seamed to have worked out in my favour, but we've had a lot more snow since I last tried to take pictures and it was well over the tops of my boots while walking out to the clothesline!

Unfortunately, the combination of all the white snow and the white background of the quilt completely throw off the colour balance of the camera, so it's hard to get a picture that turns out really nicely right now. I'll definitely be trying again when the snow is gone, but for now, this is the best photo I could get!


And while I was struggling, Meara flaunted her ability to walk on top of the snow by shoving as much of her body as she could into the deep footprints I had been leaving everywhere. At least one of us had some fun!
Request for Feedback
Now that I'm back inside and no longer almost knee deep in snow, I would like to reiterate my request from last month.
This quilt along project is meant to be a fun opportunity to bring enthusiastic quilt makers together to work on a project they all love! As such, I would love to hear your thoughts and feedback on the design of the quilt, the quality of the pattern instructions, and any wishes you may have for next year's pattern!
I would love to hear whatever thoughts you're willing to share, you can respond in the comments below or by sending me an email! I can't wait to hear from you!
It's been so exciting to share the newest instalment of the Blackwork Roads quilt pattern with you all this month! I can't wait to see how the chunk turns out in your unique colours and fabrics!
Please share your photos and stories with me by using #blackworkroadsquilt on social media, or reach out directly by email or in the comments below!
And once you've finished piecing together the March chunk, you can look forward to the release of the next one on 01 April! I look forward to contuning this journey down the Blackwork Roads together!
Until Next Time Friends, Happy Quilting!
~VA
Blackwork Roads chunks so far:


Comments