
Midnight Circus: October Four Patch Units
- vafibrearts

- Oct 7, 2025
- 4 min read
Hello Friends and Happy October!
When a month starts on a Wednesday like this October did, I inevitably spend the first week anticipating the next quilt along release. Now, after a week of waiting, it's finally time to share the next step in the Midnight Circus pattern!
It's been so exciting to see all the different colours and prints you all plan to use for your quilts, but now it's time to cut into that fabric and start piecing!
Let's take a look at this month's unit!
October Units
The first unit we'll be making for the Midnight Circus quilt along is the Four Patch!
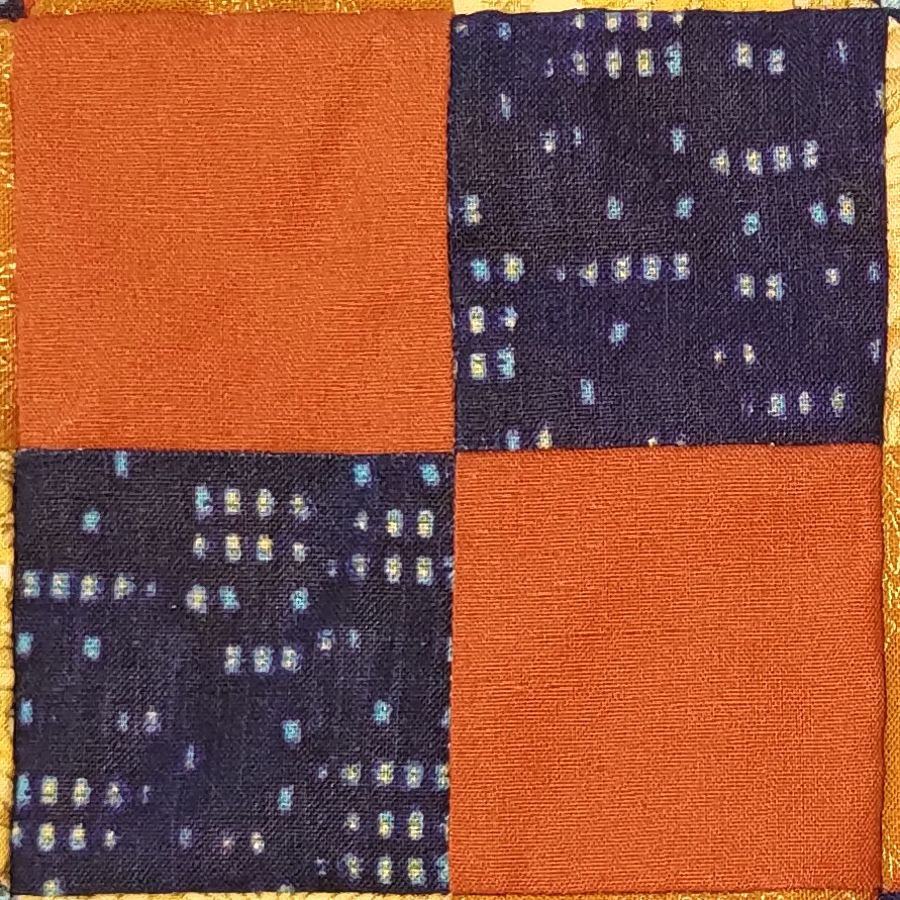
These simple units will be made using fabrics A and B, and instructions include two different methods for unit assembly; patchwork piecing and strip piecing.
Test both methods using remnants to determine which you prefer before cutting into your project fabric.
Pattern Notes
pattern assumes 44" usable width of fabric (WoF)
sew all seams using a ¼” seam allowance
press each seam before sewing the next and before trimming units
read all pattern instructions and notes before beginning to piece
optional printable templates can be downloaded here:
Patchwork Pieced Four Patch Units
This method makes one unit at a time using smaller pieces, accommodating the use of fabric scraps and remnants.
Pieces can be cut using quilting rulers or printable templates.
Cutting Instructions
Cut the pieces that correspond to your chosen quilt size.
Single Four Patch Unit:
Fabric A - 2 squares at 2 1⁄2” OR 2 small squares
Fabric B - 2 squares at 2 1⁄2” OR 2 small squares
Small Quilt:
Fabric A - 16 squares at 2 1⁄2” OR 16 small squares
Fabric B - 16 squares at 2 1⁄2” OR 16 small squares
Medium Quilt:
Fabric A - 40 squares at 2 1⁄2” OR 40 small squares
Fabric B - 40 squares at 2 1⁄2” OR 40 small squares
Large Quilt:
Fabric A - 64 squares at 2 1⁄2” OR 64 small squares
Fabric B - 64 squares at 2 1⁄2” OR 64 small squares
Piecing Instructions
Select one square each of fabrics A and B. Place them right sides together and sew along one side.

Repeat with a second square each of fabrics A and B.
Place the two square pairs right sides together with the seams aligned and the two matching fabrics on opposite ends. Sew along one long side.

Trim the finished Four Patch unit to 4 1⁄2” square.
For a small quilt, make 8.
For a medium quilt, make 20.
For a large quilt, make 32.
Strip Pieced Four Patch Units
This method makes multiple units at a time using long strips of fabric, requires width of fabric or long fabric remnants.
Pieces are cut with quilting rulers across width of fabric (WoF).
Cutting Instructions
Cut the pieces that correspond to your chosen quilt size.
Eight Strip Pieced Units:
Fabric A - 1 strip at 2 1⁄2” x WoF
Fabric B - 1 strip at 2 1⁄2” x WoF
Small Quilt:
Fabric A - 1 strips at 2 1⁄2” x WoF
Fabric B - 1 strips at 2 1⁄2” x WoF
Medium Quilt:
Fabric A - 3 strips at 2 1⁄2” x WoF
Fabric B - 3 strips at 2 1⁄2” x WoF
Large Quilt:
Fabric A - 4 strips at 2 1⁄2” x WoF
Fabric B - 4 strips at 2 1⁄2” x WoF
Piecing Instructions
Select one strip each of fabrics A and B. Place the two strips right sides
together, with the long edges aligned. Sew along that side.

Sub cut the long strip unit into 2 1⁄2” wide pieces.

Select two of the sub cut strip units. Place them right sides together with the seams aligned and the matching fabrics on opposite ends. Sew along one long side.
Repeat with the remaining sub cut strip units.
Trim the finished Four Patch units to 4 1⁄2” square.
For a small quilt, make 8.
For a medium quilt, make 20.
For a large quilt, make 32.
Full instructions for both the patchwork pieced and strip pieced methods, as well as some additional tips, can be downloaded here:
Midnight Circus Sample Quilt
I had hoped to have my quilt finished for the initial pattern release in September, but that plan got waylaid by our efforts to sell the house. However, I was able to baste together the quilt top to share with my quilt guild at our September meeting!

This gives a much better idea of how the finished quilt will look than my digital mock up, however it is missing a few triangles around the edges, and there will be an additional background border to give the piecing a little breathing room. Those will be added once I've made a little further progress on the quilting!
And speaking of quilting, I haven't found the time to add any more to this quilt just yet, but I'm optimistic that October will offer more opportunities in that regard!
Friends, I'm so excited to share the first unit of the Midnight Circus pattern with all of you and I can't wait to see how your Four Patches turn out!
Though we are all following the same instructions, the different choices each of us makes along the way will make every quilt unique!
Once you're ready to share your progress, I would love to see photos! Please share those in the comments below or on social media using #midnightcircusquilt so I can find your posts!
If you have any questions along the way, I'm happy to help! You can send me an email or ask in the comments so everyone can learn together!
Until Next Time Friends, Happy Quilting!
~VA
Midnight Circus Instructions
~ September ~


Comments