
My Method: Tips for Flying Geese
- vafibrearts

- Nov 11, 2025
- 6 min read
Hello Friends and Welcome Back!
Last week, November arrived with beautiful Autumnal weather; though overcast, it was still pretty warm! But that changed this weekend when we got our second snow of the season, and it stuck this time.
I'm not very fond of the cold weather, so I'm not thrilled that Winter is making itself known already, but it's pretty normal to have snow at this time of year, so I suppose I should be used to it by now.

Of course, the cold weather just gives me a good excuse to stay inside and work on some quilt piecing where it's warm!
And after sharing instructions for November's Midnight Circus units last week, I know just what to work on! Let's take a look at a few tips to tips to improve your Flying Geese!
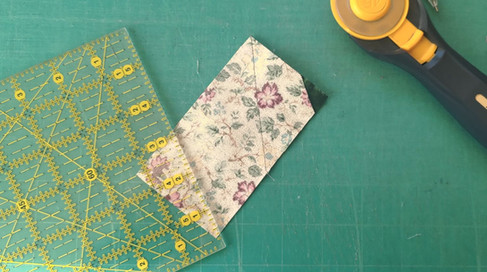
Sample Fabric
For the purposes of this post, I'll be using the following two prints;

The floral will be the main body of my Flying Goose unit, and the green will be used for the two smaller, adjacent triangles, sometimes referred to as the wings of the Goose.
It's always a good idea to press your fabric before cutting, little creases and folds can throw off the accuracy of your cuts, which in turn makes piecing less accurate.
Cutting Patchwork Pieced Units
When patchwork piecing, fabric is cut into shapes using a template or specialty ruler.
Typically, you'd prefer to cut fabric on grain—meaning to align with the vertical and horizontal weave of the fabric—since the pieces are less likely to stretch or become misshapen. However, Flying Geese are made up of triangles, so at least one side of the piece will be cut on the bias—meaning cut diagonally across the fabric—which stretches if handled roughly.
Some quilters like to starch their fabric to help prevent bias stretching, but I've never tried that and can't speak for it myself.
When cutting triangles for Flying Geese this is how I like to align them with the grain of my fabric;


For the large body triangle, I align the long side with the fabric grain, and for the smaller wing triangles, I align the two smaller sides with the fabric grain.
I like this alignment because the bias seams end up fully contained inside of the finished unit, leaving me with on grain outer edges to work with later!
If you're working with really strangely shaped remnants or trying to fussy cut, you may not be able to choose which sides align with the fabric grain, in fact, you may end up with all three sides cut on the bias.
In this case, handle your pieces gently and make a note on the bag or box they're stored in so you'll remember which pieces need to be handled with care.
~
If the pattern you're following offers paper templates and you prefer to cut using rulers, you can customize a regular square ruler by taping paper templates to the back side.

You'll need to print and cut out enough copies of the template that every side can be aligned with an edge of the ruler. The triangles used to make Flying Goose units are right triangles, so you'll need two templates; one arranged in the corner of the ruler, one with the diagonal edge running along the edge of the ruler.
The picture only shows the small wing triangle, but the larger body triangle is also a right triangle and can be arranged the same way!
Cutting Stitch and Flip Units
Stitch and flip units use square and rectangular pieces, so they can be cut on grain using regular quilting rulers, but they do produce some wasted fabric.
This is an advantage in cases like the rectangle below, which is close to the required size, but missing part of a corner.

Since two corners of this rectangle will be cut off and discarded during unit construction, we can still use this incomplete rectangle to piece a stitch and flip Flying Goose unit!
Start by laying out the small wing square on the incomplete end of the body rectangle, making sure the drawn line points into the squared off corner of the rectangle, not the incomplete corner.

Sew and trim as usual, and when the unit is complete, no one will be able to tell the difference between this unit and one made with a full body rectangle!


Cutting Four at a Time Units
Four at a time units are made of squares, one large body square and four smaller wing squares, which can be cut on grain using rulers.
To help reduce bulk at the tip of the Goose, I recommend trimming a little off the corner of the first two square wing pieces.


To figure out how much to trim, lay the two wing squares in opposite corners of the body square as usual, then use scissors to trim along the line where the two squares overlap. Only trim the corners of these first two squares, the other two need to remain fully square!
At this point, the rest of the unit can be assembled as usual, following the instructions.
Pressing the Units
Whether to press seams open or to one side is a matter of personal preference. Both methods have their own benefits and downsides, so experiment with both to determine which works best for you!
For Flying Geese, I don't have any particular tips for those who like to press their seams open; as long as you press each seam before sewing the next, your block should turn out great!
But there is a particular way I like to press my Flying Geese to reduce bulk when pressing to the side!
After sewing the first seam, press the seam allowance towards the larger body triangle. Then stitch the second seam and press that seam allowance towards the smaller wing triangle.
For the patchwork piecing and stitch and flip methods, the Flying Goose unit should look like this:


For the four at a time method, it should look like this:


Since this method makes multiple units at once, half of them will end up pressed to the right, and the other half to the left.
Depending on the pattern, there may be a different way of pressing seams that works better, but I think this is the best method for the Midnight Circus pattern!
Trimming the Units
The final step to complete your Flying Goose units is to trim them to size!
There are specialty rulers made specifically for trimming Flying Geese, but I've never used one, so the method I'll be sharing is for regular square rulers.
If you make your units using the patchwork piecing or stitch and flip methods, they should turn out very close to the right size and won't require very much trimming. But the four at a time method uses slightly over sized pieces, so it needs to be trimmed down a bit before it can be used in the quilt.
The first step to trimming a Flying Goose unit involves doing some math; take the length of the longest side and divide that in half.
For Midnight Circus, the unit should be trimmed to 4½” x 2½”, so the longest side would be 4½”. If we divide that in half, we get 2¼”.
Make a note of that measurement somewhere so you won't forget it!
Next, lay out the Flying Goose unit so it points towards you, and align the 45° line on your ruler with the rightmost seam.

This should get you really close to where you want to trim the edges of the unit, but there are three points you should double check! I've marked them each with a red dot here:

The point of the Flying Goose should be on the intersection of the horizontal and vertical 2¼” lines, that's the number we calculated earlier. The two seams should cross the top edge of the ruler at 0" and 4½”.
Once you're sure everything is aligned properly, trim the top and right sides of the unit.
Rotate the Flying Goose unit so it now points away from you and align the previously trimmed edges with the 4½” and 2½” ruler lines.

Double check that the point of the Goose is touching the ¼” line, but not going past it, then trim the remaining two edges of the unit.
After trimming, there isn't any difference between the units I made, so it really doesn't matter which method you end up using! Try out each method, keeping these tips in mind, and you should have a whole flock of perfect Geese in no time!

Friends, I hope these tips have helped you understand Flying Goose construction a little better, and that you're now looking forward to piecing your own units with confidence!
If you know any other tips, I would love to read all about them! Please share your own tips and tricks in the comments below!
Or if there is anything about the Flying Goose making process that I didn't clear up, don't hesitate to ask questions! We can chat more by email, or get help from the community by asking in the comments!
I can't wait to see how your units turn out!


Comments