
Rainbow Railfence Free Quilt Pattern
- vafibrearts

- Feb 22, 2021
- 5 min read
Hello Friends and Welcome Back!
This week, I am thrilled to share my Rainbow Railfence quilt pattern! If you've been following me for any amount of time, you've probably seen tonnes of photos of this quilt. Not only is it my first completed quilt, it's also the first pattern I've designed, so I would love to get your feedback and thoughts on it!

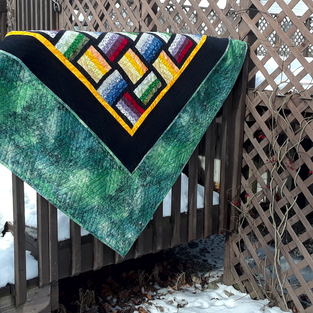


The Rainbow Railfence was first designed in December 2014. I was inspired to make a quilt for my university residence to personalize the space and show off some of my skills and interests. Unfortunately, it took me 6 years to finish the quilt, by then I had already graduated.
but I was determined to do the quilting on my first quilt myself. It took me a few years to find both the time and confidence to learn how to quilt on a domestic sewing machine. A lot of quilters have a professional quilt their projects, this is a great option if you don't have a lot of time or space to do it yourself, or if you want a really intricate quilt design for an extra special quilt.
But before we can get to the quilting, we need to make a quilt top!
Pattern Information
Just a few things to know about the Rainbow Railfence pattern before we get started;
● Quilt finishes at 74” x 86”, large enough for a twin sized bed
● Use ¼” seam allowances and press all seams towards the darker fabric
unless otherwise specified
● Fabric requirements assume 44” (1.1m) usable width of fabric (WoF)
● Fabric requirements are provided in both inches and metres, but cutting instructions are only provided in inches
Fabric Requirements

With reference to diagram 1, you will need:
1 fat quarter each of a light, medium-light, medium-dark, and dark fabric each
in blue, green, yellow, and violet, 16 fat quarters total
12” (0.3m) inner border
112” (2.8m) black
Cutting for Blocks
From each of the four blue fabrics, cut 10 strips at 1½” along the long edge, for a total of 40 strips.
Separate strips by value.
From Solid Black, cut 10 strips at 1½” x WoF.
Subcut these in half to make 20 strips at 1½” x 22” approximately.
Strip Unit Assembly
To assemble the blue unit, sew one black strip to one light blue strip along the long side. Press.
Continue sewing strips to the unit in the following order; medium-light
blue, medium-dark blue, dark blue, black as shown in diagram 2.

Press. Repeat to make 10 blue strip units.
Subcut the blue strip units to make 30 squares at 6½”.

Repeat these steps with the green, yellow, and violet fabric, making 30 squares of each colour.

TIP: If you’d like to make this pattern using scraps that are too small for the method above, cut 30 strips at 1 ½" × 6 ¾" from each of the four values of coloured fabric. You will need 120 strips total of each colour.
Cut 240 strips at 1 ½" × 6 ¾" from the black.
This measurement includes a little extra length in case the strips are not perfectly aligned. Assemble the strip units and trim to 6½” square.
Block Assembly
Before assembling blocks, determine colour placement. A few sample arrangements can be found at the end of the post.
Sew together two strip units so the strips run vertically on the first and horizontally on the second as shown in diagram 5.

Press the seam towards the black strip. Set aside.
Select two new strip units. Sew them together with the strips running
horizontally on the first and vertically on the second, the opposite placement as before, as shown in diagram 6.

Press the seam towards the black strip.
To complete the block, sew the vertical-horizontal unit and horizontal-vertical unit together as shown in diagram 7. The centre seams should nest.

Gently pull apart seams where they overlap at the centre of the block.
Press the two halves of the seam in opposite directions. Once pressed, the seams should spiral out from the centre of the block as shown in diagram 8:

Trim to 12 ½" if necessary.
Make 30.
Assembling the Quilt Top
Sew the rail fence blocks into 6 rows of 5 blocks each. Sew the rows together to make the quilt centre.

Assembling the Borders
For border assembly, reference diagram 10.
From the inner border fabric, cut 7 strips at 1½” x WoF.
Sew these strips together on the bias to make one long 1½” strip.
Subcut 2 strips at 72½” and sew one to each of the long sides of the quilt top.
Subcut 2 strips at 62½” and sew them to the top and bottom of the
quilt top.
From the black fabric, cut 8 strips at 6½” x WoF.
Sew these strips on the bias to make one long 6½” strip.
Subcut 4 strips at 74½” and sew one strip to each of the both long sides of
the quilt top, then one each to the top and bottom.

Finish the quilt by layering the quilt top with batting and backing.
Quilt and bind as desired.
Sample Colour Placement
There are many ways to arrange the colours and values in the Rainbow Railfence, below are a few samples for inspiration.
For a random quilt top, combine all coloured strip units together into one pile.
Draw units from the pile at random to form into blocks, it won’t matter if some
of the same colour are placed beside each other.
To maintain some control, draw the units from the pile at random and lay them
out into rows. Move units around until a desirable arrangement has been made.
Sew into blocks and then into rows.
Diagram 11 shows a sample of a random block arrangement and some of the different blocks found in it.

For an organized woven quilt, assemble rail fence blocks using one each of the four coloured units. Make 30 identical blocks and sew as shown in diagram 12 to create the illusion that the strips weave in and out of the quilt top.

For a more random woven quilt, lay out strip units so every horizontal unit in a row, and every vertical unit in a column are the same colour as shown in diagram 13. Almost every block will be unique so pay close attention to colour placement.

For a rolling quilt, assemble rail fence blocks using one each of the four coloured
units. Arrange them with the darkest value strip towards the centre of the block
as shown in diagram 14. Make 30 identical blocks.
When laying out the blocks, rotate each so they face in different directions. This
can be done following a pattern of consistent 90 degree rotations or by rotating
each block randomly as desired.

Download the Pattern
Click the link below to download a free PDF version of the Rainbow Railfence pattern. The PDF contains all fabric requirements, cutting and piecing instructions, and diagrams.
I hope you enjoy making this pattern as much as I did! Depending on how you choose to place your colours, rail fence blocks can produce a wide variety of finished aesthetics. I can't wait to see how you interpret this pattern to make it your own! Please share pictures with me by using #rainbowrailfencequilt, posting on the VA Fibre Arts Facebook group, or tagging me on Instagram @v.a.fibre.arts!


Comments